Batch Watermark & Frame Photos
The Batch tool allows you to make similar changes to multiple photos. You can convert, rename, resize, watermark and frame hundreds of photos in one time.
To perform batch processing, click "Batch..." button at the top of the main window.
- Overview
- Add Photo Files
- Batch Watermark & Frame
- Batch Convert
- Batch Rename
- Batch Rotate, Flip, Resize
- Output Settings
Overview

①Photo input list and watermark preview ②Batch watermark and frame option ③Output format, filename and photo-size options ④Output destination and processing options ⑤"Start Batch" button
- Add photo files to the input list.
- Choose a watermark(frame) preset.
- Set output format, filename and choose whether to resize the photos.
Note: In order to get the highest quality watermark result, all text and image watermarks and frame will be applied to a photo after resizing, so the output image size may be different from its specified photo-size. - Choose the output destination.
- Click "Start Batch" button to start processing.
Add Photo Files
There are several ways to add photo files to the input list:
- Click "Add Folder" or "Add File" button in the top center of the batch dialog.
- Drag and drop the selected folders and files to the input list.
- Select multiple files in the photo browser, then right click and select "Batch...".
File type - Select a file type to add only files of that type to the input list.
Batch Watermark & Frame
Click the Preset button to choose a preset or use current settings.
Check the "Preview" box at the middle bottom of the window, then you can preview the watermark results in the input list. If you prefer a better preview quality, check the "High quality " box, but this will need more time to load the pictures.
Batch Convert

Select a output format (BMP, JPG, PNG, TIFF) from the drop-down list. Click the "Options" button to set the format details.
Batch Rename
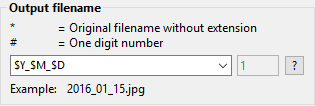
Type the name you want to use in the edit box:
* = Original filename without extension
# = One digital number
$Y = Year
$M = Month
$D = Day
$h = Hour
$m = Minute
$s = Second
When you rename the photo files with numbers, you can specify the starting number.
For example:
Typing "Seaside_#", "1", will give you "Seaside_1", for your first picture.
Typing "Seaside_##", "2", will give you "Seaside_02", for your first picture.
Batch Rotate, Flip, Resize
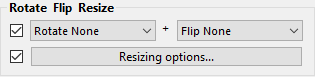
To rotate/flip images, check the box next to the rotate and flip drop-down list, then select the action you want to perform. For example:
"Rotate right(CW) + Flip horizontally" will rotate images 90°clockwise first, then flip them horizontally.
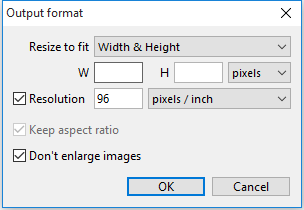
To resize images, check the box next to the "Resizing options…" button. Then click the button to set the resizing parameters.
Note: In order to get the highest quality watermark result, all text and image watermarks and frame will be applied to a photo after resizing. So the resize options only specify the size of a photo without frame. When a frame larger than the photo is added, the output size will be proportionally larger than the specified photo size.
Output Settings
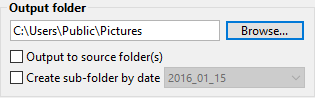
If you want to put the images into a specific folder, click the Browse button and select the output folder.
If you want the images to be placed in the same folder you loaded them from, check the "Output to source folder(s)" box.
If you want to group the images by date and put them into different subfolders, check the "Create sub-folder by date" box.
Photoshop&Lightroom are trademarks of Adobe Systems Inc.