Create Skin Mask
The skin mask allows to apply effects only to the skin area of the portrait. When you turn off the skin mask panel, the effects will be applied to the entire image.
SkinFiner automatically works out which area in your picture is skin, but sometimes you can refine the mask manually to improve the result.
Show/Hide Mask
To preview the mask in the image window, choose a mask preview option:

Note1: You can press [X] to quickly switch between the modified image and the mask.
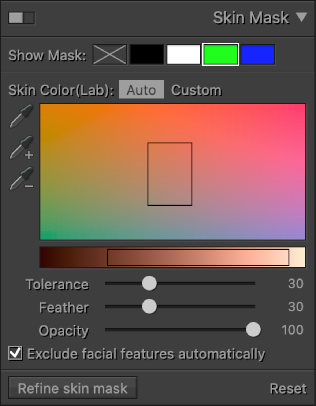
Skin Color
When "Auto" option is chosen, SkinFiner automatically detects faces for accurate skin color selection. To adjust the skin color selection, drag the Color Frame cursor in the color range monitor, or just click an area of the image with Eyedropper tools.
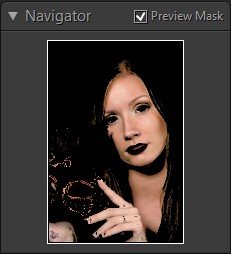 While moving the Eyedropper over the image, you can preview the skin mask change in the navigator window.
- To set a sampled skin color, select the eyedropper[S]
 , and click in the image window.
 - To expand colors, select the plus eyedropper[Shift+S](Windows)/[⇧S](Mac)
 , and click in the image window.
 - To remove colors, select the minus eyedropper[Alt+S](Windows)/[⌥S](Mac)
 , and click in the image window.
Note2: To activate the plus eyedropper temporarily, hold down [Shift](Windows)/[⇧](Mac). Hold down [Alt](Windows)/[⌥](Mac) to activate the minus eyedropper.
Note3: When the left-mouse-button is occupied, you can use the right-mouse-button to pan the image.
Sliders
Tolerance - Set a low value to select pixels very similar to the sampled skin color, while set a higher value to select a broader range of pixels.
Feather – Smoothes the mask edge to provide a more uniform mask shape.
Opacity - To add some transparency to the mask, drag the slider to the left.
Note4: Double click a slider to reset it.
Exclude facial features automatically(v4.0)
When this option is checked, SkinFiner will exclude eyes and mouths area of detected faces from the skin mask automatically.
Refine skin mask with brush
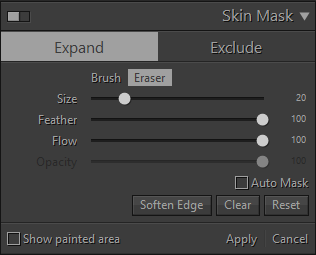
To enter the brush mode, click "Refine skin mask" button at the left bottom of the skin mask panel.
The brush panel contains two portions – Expand and Exclude.
- If you want to add some area to the skin mask, choose "Expand" mode, then the painted area will be added to the skin mask.
- If you want to remove some area from the skin mask, choose "Exclude" mode, then the painted area will be removed from the skin mask.
Brush Options:
Brush: Add the painted area. Eraser: Subtract the painted area.
Size: Specify the brush size.
Feather: Creates a soft-edged transition between the painted area and the surrounding pixels. When you use the brush/eraser, the distance between the inner and outer circle represents the feather amount.
Flow: How much paint is applied to the area for every stroke. Multiple strokes will increase the paint strength.
Opacity: The maximum opacity that the brush paints.
Auto Mask: Confines strokes to areas of similar color.
Soften Edge: Make the edges of the painted area softer.
Clear: Remove all the painting from the image.
Reset: Cancel current operation.
Hotkey notes:
- When using "Brush" tool, you can press [Alt](Win)/[⌘](Mac) to switch between "Brush" and "Eraser" modes.
- You can use [MouseWheel] to adjust the brush size, and [Shift+MouseWheel] to adjust "Feather" amount.
- When "Auto Mask" is unchecked, you can hold [Shift](Windows)/[⇧](Mac) to paint with "Auto Mask" enabled.
Photoshop&Lightroom are trademarks of Adobe Systems Inc.