Presets

Presets provide a way to save a group of adjustments and apply them to other photos. Once you create a preset, it remains there until you delete it.
Create a preset
- After making some adjustments, click
 button in the preset panel header or press [P].
 - Type a name in the Preset Name box and click "OK".

- Specify the adjustment items you want to include in the preset and click "OK".

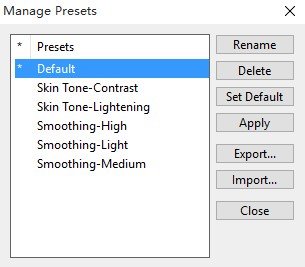
Manage Presets
 Click the Manage presets button
  or press [Ctrl+P](Windows)/[⌘P](Mac) to open the Manage Presets dialog.
- To import presets, click "Import…", then choose the preset files and click "Open".
- To export presets, select the presets and click "Export…", then specify a file folder and click "OK".
- To delete presets, select the presets and click "Delete".
- To rename a preset, select the preset and click "Rename".
- To set a preset as default, select the preset and click "Set Default", then a "*" will be shown at the left side of the preset's name. To cancel the default preset, select it and click "Set Default" again.
Copyright©Chengzhu Li, 2009-2026. All rights reserved.
Photoshop&Lightroom are trademarks of Adobe Systems Inc.
Photoshop&Lightroom are trademarks of Adobe Systems Inc.