Install Photoshop/Lightroom plugin
If you already have Photoshop/Lightroom installed on your computer, when you run SkinFiner installation file, it will install the plugin automatically. If you didn't quit Photoshop/Lightroom before the installation, please restart it after the installation finished.
If it doesn't work, you can install the plugin manually.
Install Photoshop Plugin
- Launch SkinFiner application.
- Click "Install plugin..."
 button on the top of the window.
 - Choose the install directory and install the plugin.
Plug-ins folder for Windows: C:\Program Files\Adobe\Adobe Photoshop 20xx\Plug-ins
Plug-ins folder for Mac: /Applications/Adobe Photoshop 20xx/Plug-ins - After installation successfully, quit SkinFiner and restart Photoshop.
Install Lightroom Plugin
Windows
- Start Lightroom.
- Select File > Plug-in Manager.
- Click the "Add" button.
- Browse to the folder where you installed SkinFiner, choose "skinfiner.lrdevplugin" folder and click on the "Select Folder" button.
- The SkinFiner plugin should show in the list.
Mac
- Open Finder, browse to folder "/Applications/SkinFiner.app/Contents/Resources".
- Copy the item "SkinFiner.lrplugin" to wherever you'd like to store your plugin.
- Start Lightroom.
- Select File > Plug-in Manager.
- Click the "Add" button, then navigate to the "SkinFiner.lrplugin" item in your plugin folder and click the "Select Folder" button.
- The SkinFiner plugin should show in the list.
Add to Lightroom as an External Editor
- Start Lightroom.
- Choose Edit > Preferences(Windows)/Lightroom > Preferences(Mac).
- Click tab "External Editing".
- Click "Choose" button in the Additional External Editor area.
- Window: Browse to the folder where you installed SkinFiner, select "SkinFiner.exe", then click "Choose" button.
Mac: Choose "/Applications/SkinFiner.app". - Set preferences for working in SkinFiner. The options are recommended as following:

Note: SkinFiner only supports JPEG and TIFF format. - Choose Preset > Save Current Settings As New Preset.
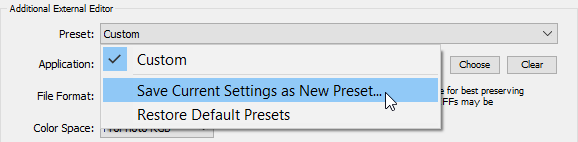
- Type a name for the preset and click "Create".
- Click "OK" to exit.
- Right click a photo, expand the "Edit In" menu, you will find SkinFiner preset in the list.
Copyright©Chengzhu Li, 2009-2026. All rights reserved.
Photoshop&Lightroom are trademarks of Adobe Systems Inc.
Photoshop&Lightroom are trademarks of Adobe Systems Inc.