PT Portrait 6
How to locate a face in step "Fitting"
After you open an image, if a face has been automatically detected, the outlines will have been automatically placed around the face. The outlines should follow the edges of the features, and the edge of the face. If any are wrongly positioned, move them into the correct place by dragging the small squares.
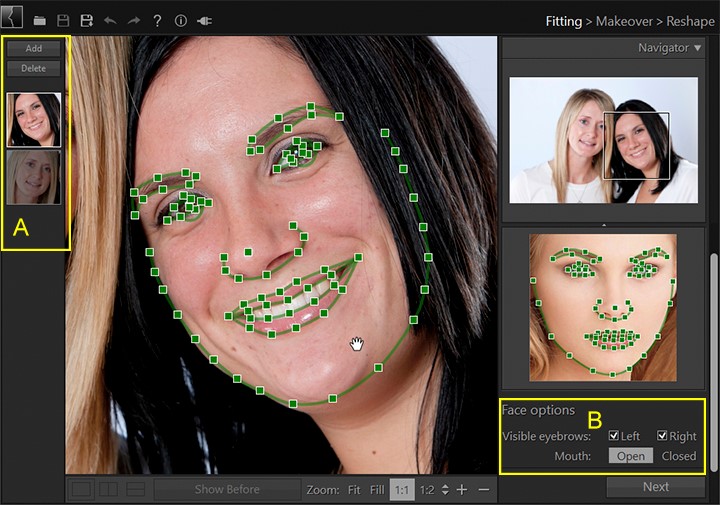
A – All the detected faces are listed in the left panel. If there is more than one face in the image, you can select each face by clicking its thumbnail from the list and edit it.
You can also add a new face or delete a face from the list. To add a new face, click "Add" button at the top of the list. To delete a face, select the face and click "Delete" button.
B – If you can’t see the eyebrow, you can uncheck the "Visible eyebrow" checkbox to hide the eyebrow outlines. Then in "Makeover" module, the eyebrow adjustments will not affect the corresponding area.
If you can’t see the teeth, choosing mouth "Closed" will hide the outlines inside the mouth, while choosing mouth "open" will show the outlines inside the mouth.
Locate a face manually
If the face in your image was not detected automatically, or after you click "Add" button on the face list panel, PT Portrait will ask you to locate a face manually.
Step1 – Select the face direction, "Front" or "Profile".

Step2 – Click on image to locate the positions of 6 key points on the face.
There is a guide image shown in the right panel to help you know where to place each point.
As you click on each point, the program will automatically move on to the next point.
You can adjust the position of any points you have already marked by clicking on one of those points and dragging it.
Step3 – Adjust the facial outlines.
After you have located the 6 key points, the facial outlines will be placed over the face. Drag the small squares to move the outlines, make them fit the face and features well.
Photoshop&Lightroom are trademarks of Adobe Systems Inc.