PT Photo Editor 5
- Provides plenty of useful adjustments and handy retouching tools
- Preserves every detail of your RAW with high quality 16/32-bit algorithms
- Supports viewing/editing image metadata
- Creates proffesional look watermarks
- Does everything in batch
Liquify Toolkit
This feature is only available in Pro edition
The Liquify toolkit lets you push, pull, rotate, pucker, and bloat any area of an image. The distortions you create can be subtle or drastic, which makes the Liquify command a powerful tool for retouching images as well as creating artistic effects.
Tools
Forward Warp tool 
Pushes pixels forward as you drag. You can control the amount of pixels pushed by changing the brush size. The larger the brush the more pixels will be pushed forward.

Push Left tool 
Moves pixels to the left when you drag the tool straight up (pixels move to the right if you drag down). This is useful for making an object thicker or thinner. You can also drag clockwise around an object to increase its size, or drag counterclockwise to decrease its size. To push pixels right when you drag straight up (or to move pixels left when you drag down), hold down [Shift] as you drag.

Bloat tool 
Moves pixels away from the center of the brush area as you hold down the mouse button or drag.

Pucker tool 
Moves pixels toward the center of the brush area as you hold down the mouse button or drag.

Twirl tool 
Rotates pixels clockwise as you hold down the mouse button or drag. To twirl pixels counterclockwise, hold down [Shift] as you hold down the mouse button or drag.

Reconstruct tool 
Reverses the distortion you’ve already added, as you hold down the mouse button and drag.

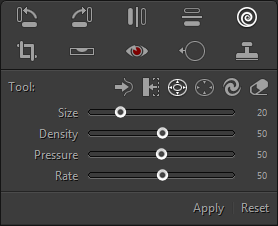
Tool options
In the tool options area of the Liquify panel, set the following options:
- Size - Sets the width of the brush you’ll use to distort the image.
- Density - This value controls how a brush feathers on the edge, by default a Liquify effect is stronger in the center of the brush and softer on the edges, you can increase the Brush Density value from 0 to 100. The larger the value, the stronger the effect on the brush tip's edges.
- Pressure - Sets the speed at which distortions are made when you drag the brush. Using a low brush pressure makes changes occur more slowly, so it’s easier to stop them at exactly the right moment.
- Rate - Sets the speed at which distortions are applied when you keep a tool (such as the Bloat tool) stationary in the image. The higher the setting, the greater the speed at which distortions are applied.
Distort an image
- Select the Liquify Tool
 in the tool strip or press [Q].
 - Choose any of the liquify tools to distort the image.
- After distorting the image, you can:
- Use the Reconstruct tool to fully or partially reverse the changes.
- Use other tools to change the image in new ways. - Do one of the following:
- Click "Apply" or to close the Liquify toolkit panel and apply the changes to the image.
- Click "Reset" to revert all distortions to the image.
Photoshop&Lightroom are trademarks of Adobe Systems Inc.